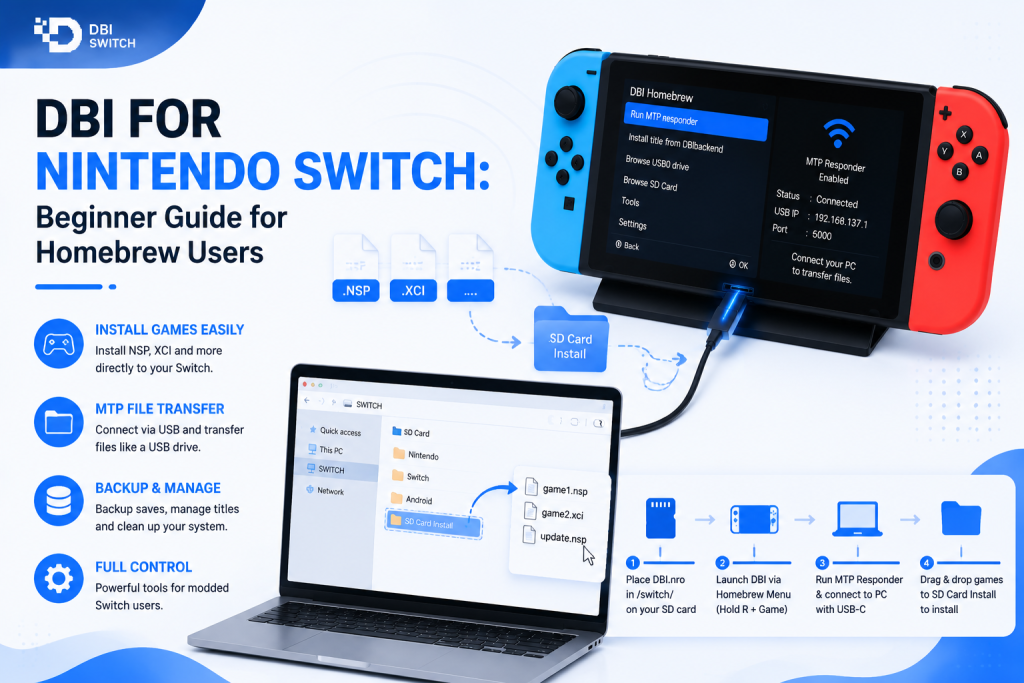
DBI (Switch): Complete guide to installing, configuring and using DBI for game installs
DBI is a Nintendo Switch homebrew utility that helps users manage game installations, updates, DLC files, and other Switch content through a custom firmware setup. It combines multiple management tools into one application, making file handling and installation tasks easier.
This guide explains how to install, configure, and use DBI for game installs. It covers the basic setup process, important features, common workflows, and troubleshooting steps to help users understand how DBI works.
DBI is mainly used by users who need a convenient way to manage Switch content from their console or through a PC connection. With the right setup, it can simplify tasks such as transferring files, organizing installed content, and maintaining storage.
What is DBI and when to use it
DBI is a Nintendo Switch guide homebrew utility designed to help users manage installed content, transfer files, and handle installation tasks through a custom firmware environment. It provides several tools in one application, making it easier to manage Switch data without relying on multiple separate programs.
DBI is mainly used by advanced Switch users who need better control over game installs, updates, DLC management, backups, and storage operations. It can simplify common workflows by allowing users to perform many tasks directly from the console or through PC connections.
DBI is useful when users need to:
- Install supported Switch content packages.
- Transfer files between a computer and Switch.
- Manage installed titles and related data.
- Check storage usage and organize files.
- Perform backup and migration tasks.
The tool is most suitable for users who already have a working homebrew setup and understand basic Switch file management. It is not intended for standard consoles without a compatible custom firmware environment.
Supported File Types and Install Targets (sysNAND vs EmuMMC)
DBI Switch supports NSP, NSZ, XCI, and XCZ packages. NSP and XCI are standard formats, while NSZ and XCZ are compressed formats that may require more free space after extraction during installation.
The main installation targets are:
- SD: Installs content on the microSD card.
- NAND: Installs content in the internal storage of the active Switch environment.
- AUTO: Uses the SD card first and switches to NAND if there is not enough space.
When using emuMMC, users should confirm that they have booted into the correct environment before installing anything. Atmosphère describes emuMMC as a virtualized or redirected NAND environment, separate from normal sysNAND use.
Key Limitations and Compatibility Notes
DBI requires a compatible homebrew and custom firmware environment. It cannot run like a standard application on an unmodified Nintendo Switch.
Important limitations include:
- Files must be compatible with the installed firmware and custom firmware version.
- Compressed NSZ and XCZ packages may need significantly more space after decompression.
- Corrupted or incomplete packages can produce installation errors.
- Choosing the wrong environment may place content in an unintended sysNAND or emuMMC setup.
- USB transfers may fail because of faulty cables, incorrect drivers, or unstable ports.
- Advanced actions can affect installed content if used incorrectly.
Users should verify available storage, use legally obtained personal backups, and confirm the active environment before starting an installation.
Main Features and Capabilities
DBI combines installation, file management, storage access, and content maintenance tools in one application. It supports several transfer methods, including MTP, USB, external storage, and HTTP from a personal server.
MTP Responder and Direct PC→microSD Installs
The MTP Responder allows a computer to recognize the Nintendo Switch as a connected media device through a USB cable. Users can access supported storage locations and transfer files without removing the microSD card from the console.
Its main advantages include:
- Accessing the microSD card directly from a PC.
- Transferring files through a standard USB connection.
- Installing supported packages by copying them to the relevant installation folder.
- Managing installed content and storage locations from the computer.
- Avoiding repeated removal and reinsertion of the microSD card.
To use this feature, users launch DBI, select Run MTP Responder, and connect the Switch to a PC with a data-capable USB cable. The available DBI folders should then appear in the computer’s file manager.
Transfer performance can depend on the USB cable, computer port, drivers, and Switch configuration. Users should only install content they have legally obtained or created from their own backups.
Requirements and Preparations
Before using DBI, the Nintendo Switch must already have a working homebrew environment. Users should also prepare the microSD card, confirm system compatibility, and back up important data before installing or managing content.
Firmware, Custom Firmware (CFW) and EmuMMC Prerequisites
DBI requires compatible custom firmware, such as Atmosphère, because it cannot run as a normal application on an unmodified Switch. Atmosphère releases may support different Nintendo Switch firmware versions, so users should check compatibility before updating the console.
Basic prerequisites include:
- A Switch capable of running homebrew.
- A compatible Atmosphère installation.
- A working Homebrew Menu.
- A properly prepared microSD card.
- Enough free space for installations and temporary files.
- A current backup of important system and SD card data.
Using emuMMC is optional, but it provides an emulated copy of the Switch internal storage that runs from the microSD card. Users should confirm whether they are booted into sysNAND or emuMMC before installing content because DBI uses the storage environment that is currently active.
Firmware, Atmosphère, boot files, and related homebrew tools should be kept compatible with one another. Users should also install only personal backups or content they are legally authorized to use.
Hardware and PC Requirements (microSD, USB Connection, Drivers)
DBI requires a reliable microSD card with enough free space for the application, installation packages, temporary data, and installed content. A computer is also useful for downloading DBI, copying files, and using USB-based installation methods.
The main hardware requirements include:
- A compatible microSD card with sufficient free space.
- A PC running Windows, macOS, or Linux.
- A data-capable USB-C cable, not a charging-only cable.
- A stable USB port, preferably connected directly to the PC.
- A microSD card reader for manual file transfers.
DBI’s MTP mode normally appears as a media device on a supported computer. However, Windows users working with DBIbackend need the libusbK driver, which can be installed through Zadig. macOS and Linux users may also need Python, PyUSB, system permissions, or USB rules for DBIbackend.
Backups and Safety Steps Before Installing Titles
Back up important data before installing titles or changing storage settings. A backup makes it easier to recover from an interrupted transfer, damaged microSD card, incorrect configuration, or accidental file removal.
Recommended safety steps include:
- Back up the complete microSD card to a computer.
- Keep a recent NAND or emuMMC backup in a separate location.
- Confirm whether the console is running sysNAND or emuMMC.
- Check available storage before starting an installation.
- Avoid disconnecting USB or removing the SD card during a transfer.
- Use only personal backups or content you are legally authorized to install.
Users should also verify that the selected package is complete and compatible with their current firmware and custom firmware setup.
Installing DBI on Your Switch
DBI is installed by placing its homebrew files in the correct folder on the Switch microSD card. The console must already have a working custom firmware and Homebrew Menu setup before DBI can be launched.
Install from Official Release Assets (Web)
DBI release files are published on the project’s GitHub releases page. The current release list includes newer Russian-only builds, while the repository identifies version 658 as the latest official release containing English. Unofficial language patches are distributed separately and should be approached carefully.
To install DBI from a release package:
- Open the official DBI releases page and select the required release.
- Expand the release assets and download the appropriate package.
- Extract the downloaded archive on the computer.
- Copy DBI.nro and any included configuration files to sdmc:/switch/DBI/.
- Safely eject the microSD card and return it to the Switch.
- Open the Homebrew Menu and launch DBI.
PC-side files such as dbibackend.exe are only required when using the DBIbackend USB installation method. They do not need to be copied to the Switch SD card.
Manual Install: Files and Folder Placement on microSD
For a manual installation, connect the microSD card to a computer and create a DBI folder inside the switch directory. Copy both DBI.nro and dbi.config into the following location:
sdmc:/switch/DBI/
The final folder should contain:
- DBI.nro, which launches the application.
- dbi.config, which stores DBI settings.
- Optional support files included with the selected release.
After copying the files, safely eject the microSD card and return it to the Switch. DBI can then be opened through the Homebrew Menu. The official documentation states that it can run in applet or application mode, although it is mainly designed for applet mode.
Initial Setup and Configuration
DBI includes a built-in configuration menu, so most settings can be adjusted without manually editing dbi.config. The configuration file remains useful for advanced options, custom storage shortcuts, and settings that are not shown in the interface.
First Launch: Permissions and Storage Path Settings
On the first launch, confirm that DBI opens correctly and detects the microSD card and active NAND environment. The main screen shows available SD and NAND storage, helping users check whether enough free space is available.
Important first-time checks include:
- Confirm that SD card folders can be opened.
- Check the displayed SD and NAND storage capacity.
- Enable only the main menu features you plan to use.
- Review installation options such as hash checking.
- Confirm whether the console is running sysNAND or emuMMC.
The dbi.config file must remain beside DBI.nro in the DBI folder. Custom local or network storage paths can also be added through this configuration file when required.
Configuring MTP Responder Options and Timeouts
The MTP Responder allows the Switch to appear as a connected device on a PC or supported Android device. It can provide access to the SD card, installed applications, saves, installation folders, and other enabled storage areas.
Available MTP settings include:
- Showing or hiding combined NSP entries.
- Displaying the Mods and Cheats folder.
- Using Title IDs for mod folder names.
- Turning off the Switch screen during MTP mode.
- Enabling Android extensions for compatibility with some MTP clients.
- Choosing which MTP storage sections appear on the PC.
DBI also provides a general ScreenIdleTimeout setting measured in seconds. This controls when the console screen becomes idle, but the official documentation does not list a separate MTP transfer-timeout option. Users experiencing interrupted transfers should check the USB cable, port, PC power settings, and MTP compatibility options instead.
Choosing Default Install Location and Handling EmuMMC vs sysNAND
DBI provides SD, NAND, and AUTO installation targets. SD stores the installed content on the microSD card, while NAND uses the internal storage of the environment currently running. AUTO normally selects the SD card first and falls back to NAND when there is insufficient space.
Before installing, confirm whether the Switch is running sysNAND or emuMMC:
- sysNAND: NAND refers to the console’s physical internal storage.
- emuMMC: NAND refers to the active emulated internal storage on the microSD card.
- SD: Uses the normal microSD content storage available to the active environment.
Users should avoid switching environments accidentally and verify the available space before selecting an installation target.
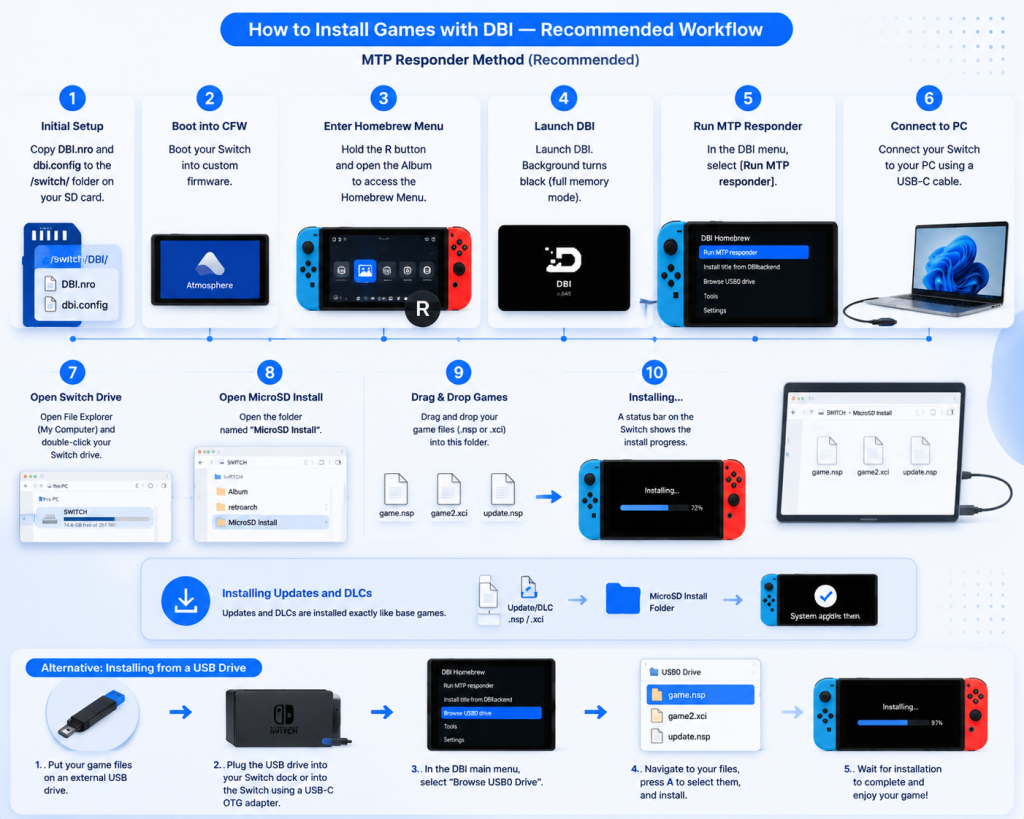
How to Install Games with DBI — Recommended Workflow
The MTP Responder provides a convenient way to install legally obtained personal backups directly from a PC. It avoids removing the microSD card and allows DBI to handle the transfer and installation over a single USB connection.
Enable MTP Responder and Connect to the PC
Open DBI from the Homebrew Menu and select Run MTP Responder. The X button can also be used as a shortcut from DBI’s main screen.
Connect the Switch to the computer using a data-capable USB-C cable. The PC should display DBI as an MTP device with folders such as:
- 1: SD Card
- 5: SD Card install
- 6: NAND install
- 7: Saves
Keep DBI open in MTP mode while transferring files. If the device is not detected, try another USB cable, port, or direct connection without a USB hub.
Transfer Game Files to the microSD Install Folder from PC
On the PC, open 5: SD Card install and copy the supported installation package into this virtual folder. DBI supports NSP, NSZ, XCI, and XCZ files, but users should install only content they legally own or are authorized to use.
Important points include:
- Use 5: SD Card install for microSD installation.
- Use 6: NAND install only when internal storage is intended.
- Check free space before transferring compressed NSZ or XCZ files.
- Do not disconnect the cable while the transfer is active.
When a file finishes copying to the SD install folder, DBI installs it directly on the microSD card. The package is streamed over MTP rather than stored as a normal installation file on the card.
Start Installs in DBI and Monitor Progress
When using the MTP installation folders, the installation begins during the file transfer process. The Switch screen displays the current file, transferred data, installation speed, and any warnings or errors.
Users should monitor:
- Transfer and installation progress.
- Remaining storage space.
- Hash or file-integrity warnings.
- USB communication errors.
- The final installation-complete message.
If the package was copied to a normal SD card folder instead, open Browse SD Card in DBI, select the file with X, press A, choose the installation target, and select Start install. Wait for the completion message before closing DBI or disconnecting the device.
Verify Successful Installation on the Switch
After DBI reports “Installation Complete. Press B to return,” exit the installer and check the Nintendo Switch HOME Menu. The newly installed title should appear with its correct icon and name.
Users can also open Browse installed applications in DBI to confirm:
- The base game appears in the application list.
- The correct version is displayed.
- Updates and DLC are listed under content records.
- The installation location shows SD or NAND.
- No content is marked as missing.
DBI also provides a Check integrity option in the title’s context menu. This can verify installed content when files appear incomplete or the title does not launch correctly. Only legally obtained content or personal backups should be installed.
Troubleshooting Common Issues
Most DBI installation problems are related to USB connections, insufficient storage, corrupted packages, outdated software, or microSD card errors. Reading the exact message shown by DBI usually helps identify the correct solution.
Avoid deleting tickets, system files, or installed records unless you understand their purpose. Start with basic connection, storage, and file-integrity checks.
MTP Device Not Detected / Connection Problems
When the PC does not detect DBI’s MTP device, first confirm that Run MTP responder is active and DBI remains open. Pressing X from the main menu starts or exits MTP mode.
Try these fixes:
- Use a data-capable USB-C cable.
- Connect directly to another PC USB port.
- Avoid USB hubs and charging-only cables.
- Restart DBI, the Switch, and the computer.
- Test with another cable or computer.
- Check Windows Device Manager for connection errors.
For DBIbackend rather than MTP, Windows requires the libusbK driver. This driver should not normally be installed for the standard MTP Responder workflow.
Install Stuck, Failed, or Partial Installs
A stuck or failed installation can result from an unstable USB connection, a damaged source file, a slow microSD card, or insufficient storage. Compressed NSZ and XCZ packages may require much more installed space than their downloaded size.
Recommended checks include:
- Confirm enough free space is available on the selected target.
- Replace the USB cable or change the PC port.
- Verify or download the source package again.
- Check the microSD card for file-system errors.
- Update DBI, custom firmware, and system firmware where required.
- Enable hash checking to detect damaged content during installation.
Messages such as TRANSFER CRC ERROR usually indicate a cable, port, file, or storage problem. NOT ENOUGH SPACE means additional space must be freed, while SOME CONTENTS ARE MISSING may indicate a damaged or unreliable microSD card. Remove any incomplete installation using normal content management options before trying the installation again.
Frequently Asked Questions
Can DBI Install NSP, NSZ, XCI, and XCZ Files?
Yes, DBI supports NSP, NSZ, XCI, and XCZ package formats. Standard and compressed packages can be installed through MTP, USB, or files stored on the microSD card. Compressed files may require more storage space after installation, so users should check available space before starting. Only personal backups or legally authorized content should be installed.
Should I Install Games to SD, NAND, or AUTO in DBI?
The SD option installs content on the microSD card, while NAND uses the internal storage of the currently active sysNAND or emuMMC environment. AUTO normally selects the SD card first and may use NAND when space is limited. Most users should choose SD to preserve internal storage and confirm the active environment before installing.
Why Does DBI Show an Error During Game Installation?
Installation errors may occur because of a corrupted package, insufficient storage, an unstable USB connection, or a damaged microSD card. Users should check the exact error message, confirm available space, try another data-capable USB cable, and verify the source file. Keeping DBI, firmware, and custom firmware compatible can also prevent runtime and installation problems.
Latest Post:
- How to Use DBI Installer on Nintendo Switch: Complete Beginner’s Guide
- Is DBI Safe for Nintendo Switch? Risks, Safety Tips, and What to Know
- How to Install DBI on Nintendo Switch: Complete Setup Guide
- Domain Lookup: Check a Domain Before You Use It
- How to Install Switch Games Using DBI: Safe and Legal Guide for Modded Nintendo Switch