DBI for Nintendo Switch: Complete Guide to Installing and Managing Games
DBI is a homebrew utility for Nintendo Switch systems running compatible custom firmware. It combines game installation, file transfer, storage management, save handling, and installed content tools into a single application.
This guide explains how DBI works, how to prepare the required setup, and how to manage legally obtained game files safely.
What DBI Does and When to Use It
DBI allows users to install and manage supported Nintendo Switch content through a microSD card, USB connection, MTP Responder, or other compatible transfer methods. It also provides access to installed applications, save data, storage information, and file-management tools.
DBI is useful when you need to:
- Install legally obtained game backups, updates, or DLC.
- Transfer files between a computer and the Switch.
- View and manage installed applications.
- Check storage space on the microSD card or active NAND.
- Back up or restore supported save data.
- Diagnose incomplete files or failed installations.
DBI should only be used on a Switch with a properly configured homebrew and custom firmware environment. Users should confirm whether they are running sysNAND or emuMMC before installing content, as the selected environment affects where data is stored.
Requirements and Compatibility
DBI requires a Nintendo Switch that can run homebrew applications through compatible custom firmware. Before installing it, confirm that the firmware, custom firmware, bootloader, and Homebrew Menu work correctly together.
DBI does not modify a stock Switch to support homebrew. The required environment must already be configured.
Supported Switch Environments (EmuMMC / CFW Overview)
DBI runs inside a custom firmware environment such as Atmosphère. EmuMMC is optional and creates a redirected copy of the Switch system storage on the microSD card.
| Feature | Custom Firmware (CFW) | EmuMMC |
| Main purpose | Runs homebrew and system modifications | Keeps a separate emulated system environment |
| Storage used | Can run with sysNAND or emuMMC | Uses files or a dedicated partition on the microSD card |
| DBI support | Required for launching DBI | Supported but not strictly required |
| Installation location | Depends on the active environment | NAND installs remain inside the active emulated environment |
| Recommended check | Verify firmware compatibility | Confirm emuMMC is active before installing content |
Users should always confirm whether they are running sysNAND or emuMMC before selecting NAND as an installation destination.
Files, Hardware, and Tools You’ll Need
A basic DBI setup requires:
- A compatible Nintendo Switch with working custom firmware.
- A properly configured Homebrew Menu.
- A reliable microSD card with enough free storage.
- The official DBI release files, including DBI.nro.
- A computer for downloading and transferring files.
- A data-capable USB-C cable for MTP or USB transfers.
- A microSD card reader for manual installation.
DBI supports installation and file management through MTP, USB, external storage, microSD, and a personal HTTP server. Additional PC-side tools or drivers may be needed when using DBIbackend instead of the standard MTP Responder.
Users should also keep backups of important SD card and system data before installing or managing legally obtained game content.
Installing DBI on Your Switch
DBI is installed as a standard Nintendo Switch homebrew application. The Switch must already have a compatible custom firmware environment and a working Homebrew Menu before installation.
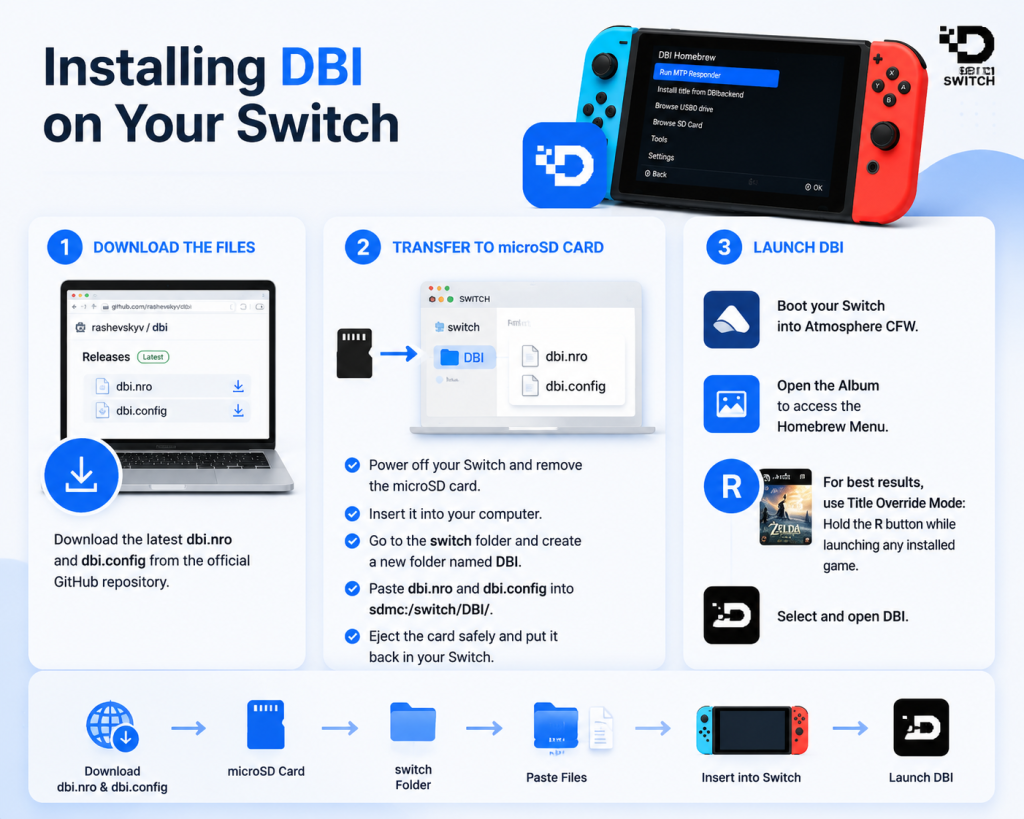
Installing the DBI Homebrew App: Overview of Steps
Download the required DBI release package from the official project source and extract it on your computer. Copy the application files to the DBI folder inside the switch directory on the microSD card.
The basic installation process is:
- Connect the microSD card to your computer.
- Create the folder sdmc:/switch/DBI/ if it does not already exist.
- Place DBI.nro and its configuration file inside that folder.
- Safely eject the microSD card and insert it into the Switch.
- Boot into custom firmware and open the Homebrew Menu.
- Select DBI to confirm that the application launches correctly.
The DBI configuration file should remain in the same folder as DBI.nro. PC-side tools such as DBIbackend are not required for the standard MTP Responder method.
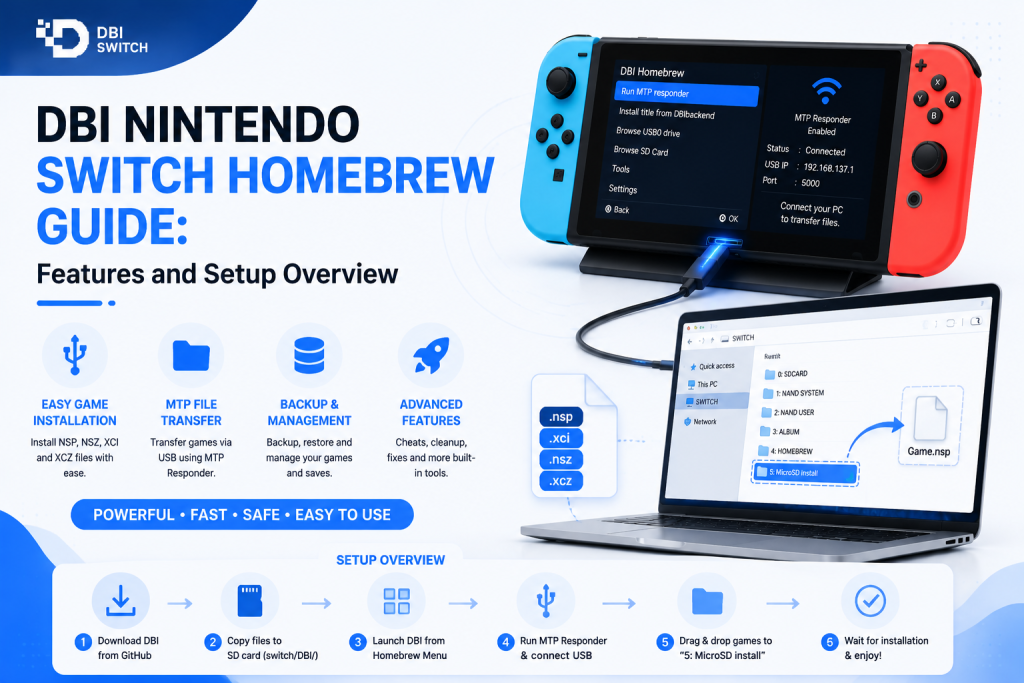
Install Games Using DBI via MTP Responder (Step-by-Step)
The MTP Responder allows the Switch to appear as a connected media device on a computer. It can be used to transfer and install supported, legally obtained personal backups without removing the microSD card.
- Open DBI through the Homebrew Menu.
- Select Run MTP Responder, or press X from the DBI main screen.
- Connect the Switch directly to the computer using a data-capable USB-C cable.
- Open the DBI device from the computer’s file manager.
- Open 5: SD Card install to install the title on the microSD card.
- Copy the supported game package into the installation folder.
- Keep the USB connection active while DBI transfers and installs the content.
- Monitor the Switch screen for progress, warnings, or installation errors.
- Wait for the completion message before closing DBI or disconnecting the cable.
- Return to the HOME Menu and verify that the installed title appears correctly.
DBI Nintendo Switch supports NSP, NSZ, XCI, and XCZ packages through its installation tools. Users should confirm sufficient storage space and install only content they legally own or are authorized to use.
1. Boot into CFW / EmuMMC
Power on the Nintendo Switch and boot into the custom firmware environment used for homebrew applications. Users with an EmuMMC setup should confirm that EmuMMC is active before continuing.
This check is important because DBI installs and manages content within the currently active environment. Starting DBI in sysNAND by mistake may place files or installed content in a different location than intended.
2. Open the Homebrew Menu and Launch DBI
Open the Homebrew Menu from the active custom firmware environment and locate DBI in the application list. Select the DBI icon to launch the utility.
Confirm that DBI opens normally and displays storage information for the microSD card and active NAND environment. Do not continue if the application reports missing files, storage errors, or an incompatible setup.
3. Start the MTP Responder in DBI
From the DBI main menu, select Run MTP Responder. DBI will enter MTP mode and prepare the Switch for a USB connection with the computer.
Keep DBI open on this screen while connecting the Switch. The computer should recognize it as an MTP device and display DBI folders for storage access, title management, and installing legally obtained personal backups.
4. Connect Your Switch to PC and Locate the Device
Keep DBI running in MTP Responder mode and connect the Switch directly to the computer using a data-capable USB-C cable. Avoid charging-only cables and USB hubs because they may cause detection or transfer problems.
Open File Explorer on Windows or a compatible MTP application on another operating system. The Switch should appear as a connected DBI device containing several numbered storage folders.
5. Open the microSD Install Folder on the Switch
Open the DBI device and locate 5: SD Card install. This virtual folder sends the selected package directly to the microSD installation target.
Do not confuse it with 1: SD Card, which provides normal file access. Copying a package to the regular SD Card folder stores the file but does not automatically begin the MTP installation workflow.
6. Drag-and-Drop Game Files and Begin Installation
Drag a supported NSP, NSZ, XCI, or XCZ package into 5: SD Card install. DBI will begin transferring and installing it without first saving the complete installation package as a normal file on the microSD card.
Install only personal backups or content you are legally authorized to use. Confirm that enough storage space is available before beginning, especially when working with compressed packages.
7. Monitor Progress and Confirm Installation Completion
Keep the USB cable connected and leave DBI open while the installation is running. The Switch screen displays information such as the current package, transfer progress, installation speed, and possible warnings.
Wait until DBI Switch confirms that the installation has completed. Do not disconnect the Switch, close MTP mode, or power off the console while data is still being transferred.
8. Post-Install Checks and Verifying Installed Titles
Return to the Nintendo Switch HOME Menu and confirm that the installed title appears with the correct name and icon. Launching it can help confirm that the base content, update, and required data are available.
DBI also provides Browse installed applications, where users can review:
- The installed title and version
- Its SD or NAND storage location
- Available updates and DLC
- Missing or incomplete content
- File-integrity information
If the title does not appear or DBI reports an error, check the installation result, available storage, source-package integrity, and active sysNAND or emuMMC environment before attempting another installation.
Common DBI Tasks and Features
DBI includes tools for reviewing installed content, managing storage, checking file integrity, and removing unwanted data. These options are available through the main menu and reduce the need to use several separate homebrew utilities.
Managing Installed Titles and Storage Considerations
Open Browse installed applications to view installed base games, updates, DLC, versions, Title IDs, storage usage, and content locations. DBI identifies whether files are stored on the SD card, NAND, both locations, or a game card.
Useful title-management actions include:
- Moving selected titles between SD and NAND.
- Checking installed content for integrity errors.
- Deleting an entire title or individual updates and DLC.
- Viewing detailed storage, version, SDK, and content information.
- Exposing selected title contents through MTP.
- Cleaning files left behind by interrupted or failed installations.
Keep enough free space on the selected storage target and confirm whether DBI is running inside sysNAND or EmuMMC before moving content. The main DBI screen displays the available SD and NAND capacity, which helps users check storage before starting an operation.
Troubleshooting & Common Errors
DBI problems are commonly connected to the USB cable, computer port, MTP configuration, storage condition, or application setup. Start with simple connection checks before changing drivers or configuration files.
MTP Connection Not Recognized: Stepwise Fixes
When the DBI device does not appear on the computer, follow these steps:
- Confirm that Run MTP responder is active and keep DBI open.
- Disconnect and reconnect the USB-C cable.
- Use a data-capable cable instead of a charging-only cable.
- Connect directly to another computer USB port and avoid USB hubs.
- Exit MTP mode with X, restart it, and reconnect the Switch.
- Restart the Switch and the computer if the device still does not appear.
- Check that the required MTP storage folders are enabled in DBI settings.
- Test another cable or computer to identify a hardware or operating-system issue.
The standard MTP Responder uses the computer’s normal MTP support. The separate libusbK driver is intended for the DBIbackend USB method and should not normally be required for MTP Responder.
Frequently Asked Questions
The following questions address common concerns about DBI safety, multiple installations, MTP connection problems, and storage management on Nintendo Switch.
Is DBI Safe to Use on a Nintendo Switch?
DBI is generally safe when downloaded from a trusted source and used in a correctly configured custom firmware environment. However, incorrect file handling, interrupted installations, or changes to important system content may cause errors or data loss. Users should keep backups, confirm whether sysNAND or EmuMMC is active, and install only legally obtained personal backups.
Can DBI Install Multiple Game Files at the Same Time?
DBI can process multiple supported installation packages in a single session. Users can select several files through the file browser or transfer multiple packages to an MTP installation folder. DBI normally handles them as an installation queue rather than installing every file simultaneously. Keep enough storage available and do not disconnect the USB cable until all selected installations are complete.
Why Is My PC Not Detecting DBI MTP Responder?
The PC may fail to detect DBI because of a charging-only cable, faulty USB port, inactive MTP mode, or operating system compatibility issue. Confirm that Run MTP Responder is active, reconnect the Switch directly to another USB port, and try a different data-capable cable. Restarting DBI, the console, or the computer can also restore the connection.
Can DBI Move Installed Games Between System Memory and microSD?
DBI can move supported installed content between NAND storage and the microSD card through its installed-application management tools. Before moving a title, check that the destination has enough free space and confirm whether DBI is running in sysNAND or EmuMMC. Avoid interrupting the process, as an incomplete transfer may leave missing or unusable content.
Latest Post: